Istio Installation on Minikube: A Secure Microservices Environment
In today’s rapidly evolving IT landscape, microservices have become the backbone of modern application development, offering flexibility, scalability, and agility. However, with the increasing complexity of microservices architectures, ensuring robust security measures is paramount to safeguard sensitive data and maintain the integrity of applications. This is where Istio, a powerful service mesh tool, plays a crucial role. Forbes mentions that Istio provides advanced traffic management, security, and observability capabilities by seamlessly integrating with Kubernetes clusters, empowering organizations to build and manage secure microservices environments effectively. In this blog, we will guide you on installing Istio and setting up the service mesh using secure configurations.
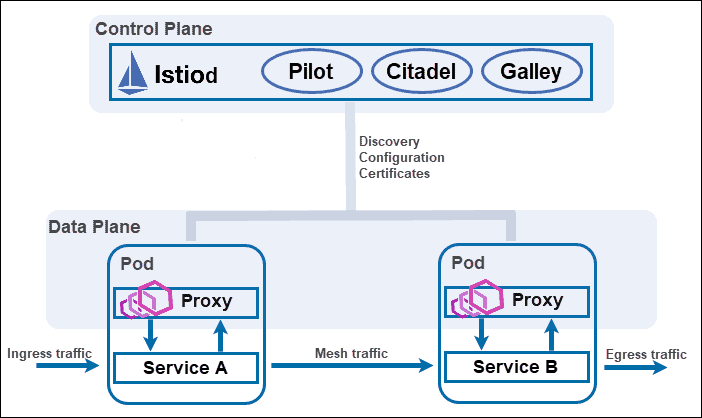
Istio is an open-source service mesh that enhances distributed applications’ connectivity, observability, and security. It seamlessly integrates with existing services, providing features such as traffic control, service discovery, load balancing, resilience, observability (metrics collection, distributed tracing, and logging), and security (including mutual TLS authentication, access control, and encryption).
To install Istio, you can use tools like the Istio CLI (istioctl), Helm charts, or Istio Operator. Ensure you have a Kubernetes cluster set up on a local environment like Minikube or a cloud platform such as Google Kubernetes Engine or Amazon EKS. Let’s start installing Istio on our minikube cluster.
Download Istioctl
- Download the Istio installation file.
curl -L https://istio.io/downloadIstio | ISTIO_VERSION=1.20.3 TARGET_ARCH=x86_64 sh –
- Move to the Istio package directory. Let’s say the downloaded Istio version is istio-1.20.2.
cd istio-1.20.2
- Add the istioctl client to your path.
export PATH=$PWD/bin:$PATH
Install Istio
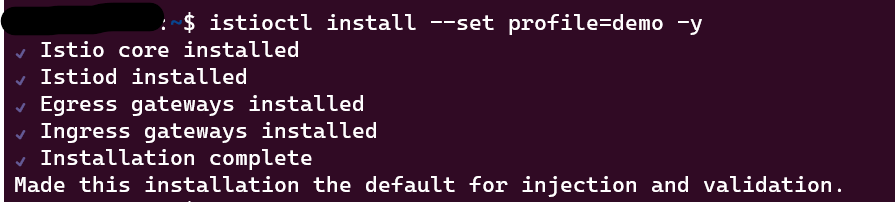
- In this installation, we use the demo configuration profile.
istioctl install –set profile=demo -y
If your installation is successful, you will get the below result.
- Add a namespace label to tell Istio to inject Envoy sidecar proxies automatically when you deploy your app later:
kubectl label namespace default istio-injection=enabled
Note: We enable envoy sidecar proxies injection for the default namespace. If your application is deployed in a different namespace, you must enable istio-injection for that particular namespace. For example, my application will be deployed under the namespace mesh-test. Then, you must change the above command, as shown below.
kubectl label namespace mesh-test istio-injection=enabled
Now, you have successfully set up Istio on K8s cluster!
Deploy the Sample Application
This is completely optional. If you have your own application, deploy it with Istio and look at the results. However, istio directory has a sample application as well named bookinfo. Let’s deploy it and play around to become familiar with Istio.
- Create the bookinfo application in the default namespace using the YAML file provided with the download.
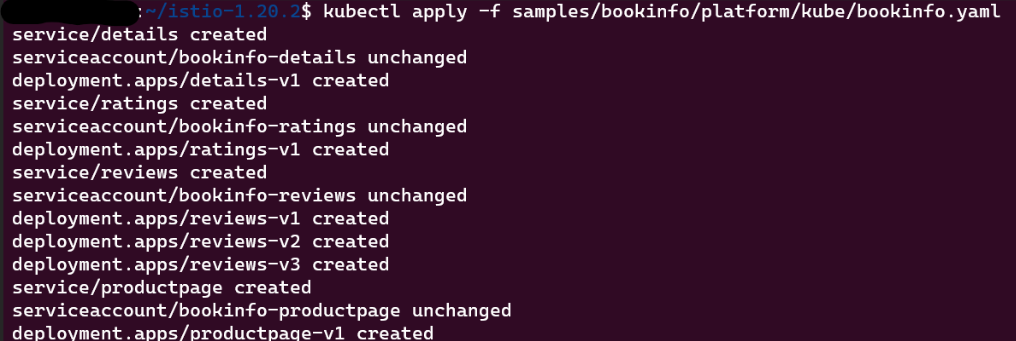
kubectl apply -f samples/bookinfo/platform/kube/bookinfo.yaml
This will install all of the BookInfo application’s components into the cluster’s default namespace.
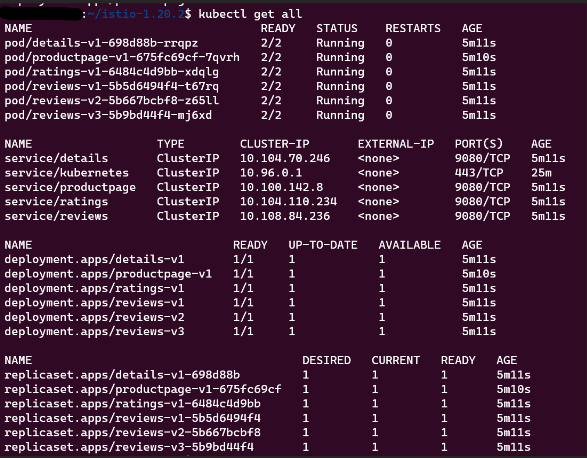
Now, you can view all the components deployed with this application using the below command.
kubectl get all
This command shows all the resources used to deliver the BookInfo application in a running state.
- Now we will associate the BookInfo application with an Istio Service Mesh Ingress Gateway to enable the mesh to control the application flow by issuing the following command:
kubectl apply -f samples/bookinfo/networking/bookinfo-gateway.yaml

- Run the below command to see if the app is running inside the cluster and serving HTML pages by checking for the page title in the response:
kubectl exec “$(kubectl get pod -l app=ratings -o jsonpath='{.items[0].metadata.name}’)” -c ratings — curl -sS productpage:9080/productpage | grep -o “<title>.*</title>”

- Run the below command and ensure that there are no issues with the configuration:
istioctl analyze

- Run this command in a new terminal window to start a Minikube tunnel that sends traffic to your Istio Ingress Gateway. This will provide an external load balancer, EXTERNAL-IP, for service/istio-ingressgateway.
minikube tunnel
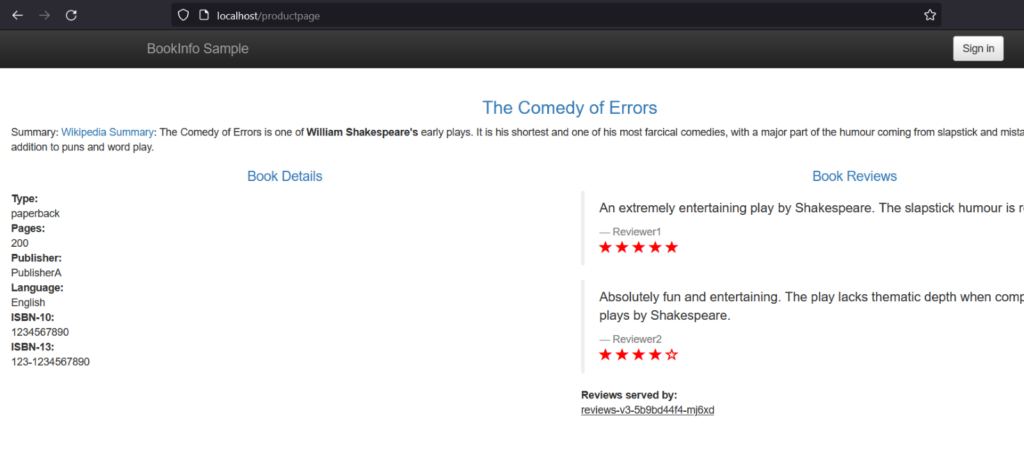
- Paste the below link into your web browser and confirm that the Bookinfo product page is displayed.
How to Achieve Service Mesh Secure Configurations?
Organizations can mitigate the risk of data breaches, unauthorized access, and malicious attacks targeting microservices interactions by enforcing secure configurations. Secure service mesh configurations enable granular control over traffic routing, encryption, and access policies, enhancing the overall security posture of the system. The following is a list of secure configurations for Istio Deployments, which are related to the core technology of Service Mesh.
- Harden the Control Plane Access – The proposed solution allows administrative privilege in shaping network traffic, including traffic shifting and steering, retries with back-offs, canary, and A/B testing of all services in multiple clusters. The architecture and design must include federated access and RBAC controls on the control plane. Furthermore, the control plane should have strict RBAC to limit administrators’ ability to manage or update specific workloads.
- Utilize Istio CNI Interface – The proposed architecture utilizes the default Istio injection pattern where an init container, istio-init, in pods deployed in the mesh. The istio-init container redirects the pod network traffic to/from the Istio sidecar proxy. This requires the control plane service account deploying pods to the mesh to have over-privilege Kubernetes RBAC permissions to deploy containers with the NET_ADMIN and NET_RAW capabilities –a security issue.
- The Istio CNI plugin replaces the istio-init container, which performs the same networking functionality without requiring Istio users to enable elevated Kubernetes RBAC permissions. The Istio CNI plugin identifies user application pods with sidecars requiring traffic redirection. It sets this up in the Kubernetes pod lifecycle’s network setup phase, thereby removing the requirement for the NET_ADMIN and NET_RAW capabilities for users deploying pods into the Istio mesh. The Istio CNI plugin replaces the functionality provided by the istio-init container.
- Enhance Centralized Network Firewall Rules Management – As the service mesh controls the network shaping and rules, it is essential that the control plane can ingest and respect our existing network policies. The proposed document does not highlight how the existing control plane will enforce policies like Calico in the design. By default, the Kubernetes controller turns off integration container firewall tools such as Calico. We recommend centralized management of the container firewall via integration at the envoy proxy level and external management tool.
- Harden Remote Cluster Permissions and Access – The Kubernetes API server in the remote cluster must be accessible to the external control plane cluster. The access provided to the control cluster must be least privileged based on the mesh service use cases (security, read-only observability, or traffic management). Access to the remote clusters from the control plane should be limited based on network rules.
- Optimize Virtual Service Access – The proposed architecture does not utilize virtual services. A Virtual Service defines a set of traffic routing rules to apply when a host is addressed. Each routing rule defines matching criteria for traffic of a specific protocol. The virtual service would ensure the routing management would scale as workloads and services increase across multiple clusters.
- Permissive Network Access to Control Plane – The Istiod control plane cluster must expose at least three ports (status, TLS, webhook). These ports must be exposed via a dedicated gateway. Using network firewall rules and security groups, the gateway must be configured to accept traffic from known remote cluster locations.
- Protect Control Plane hostname DNS – The Istiod control plane cluster must be exposed for remotes to connect. The control plane hostname must be signed with an enterprise-wide certificate. Inversely, all the remotes must use hostname instead of IP address for the ISTOD remote and validate endpoints.
- Scan and Validate the Istio Proxy Image – The proxy sidecar container images must be sourced from an internal repository and scanned periodically for vulnerabilities.
- Limit Proxy CPU and Memory Consumption – The design does not show the specific CPU and memory limitation values. Still, a review of the reference pattern does not utilize CPU limits. We recommend using specific upper limits on memory and CPU utilization by the sidecar containers.
- Explicit Orchestration for Enhanced Network Efficiency – The architecture utilizes the automatic or mentions in what order the sidecar will be deployed. Without explicit orchestration, the service might be unavailable after the sidecar deployment, leading to undefined behavior. We recommend defining the default explicit init and drain process for the sidecar containers regarding the services.
- Protect Remote Injection URL – The architecture should use a local injection webhook when creating the remote Istio install configuration. Public exposed or untrusted URLs for the injection webhook can be a security issue.
In conclusion, following the practices outlined, organizations can proactively address potential threats and vulnerabilities, ensuring a resilient and secure infrastructure. Prioritizing security measures during installations protects against immediate risks and helps mitigate long-term consequences, such as data breaches and compliance violations. Organizations must stay vigilant and adhere to best practices to fortify their systems against evolving cyber threats. For more insightful blogs, visit auxin.io