Practical Guide to getting start to DAST
Understanding DAST
Dynamic Application Security Testing (DAST) is an important component of any comprehensive application security program. DAST involves scanning web applications for common security vulnerabilities, such as SQL injection, cross-site scripting (XSS), and cross-site request forgery (CSRF), and reporting any vulnerabilities found to the development team for remediation.
This methodology provides immediate insights and expedites the discovery of vulnerabilities, optimizing the development workflow. Dynamic Application Security Testing (DAST) offers several benefits, including:
- Detection of Vulnerabilities: DAST tools can identify security flaws in web applications that attackers could exploit. This helps developers and security teams understand how an application might be attacked and take measures to fix these weaknesses.
- Real-world Testing: DAST tests an application in its live state, allowing it to find vulnerabilities that other security tests, such as static analysis or manual code review may not detect.
- Fast Testing: DAST tools can quickly scan an application to find vulnerabilities, allowing security teams to prioritize fixing the most critical issues.
- Comprehensive Assessment: DAST can test the entire application, including its user interface, web services, and backend components, giving a thorough evaluation of the application’s security.
- Cost-effectiveness: DAST is a cost-effective way to assess the security of web applications since it doesn’t require access to the application’s source code or specialized security expertise.
- Compliance: DAST can help ensure web applications comply with industry standards and regulations, such as PCI DSS or GDPR.
Let’s do a real world example
We’re about to delve into a practical guide on conducting DAST scans. If you’re interested in utilizing AlphaScale for this purpose, you can sign up through the following link: https://portal.auxin.cloud/signup. There is no cost associated with scanning your code. and there’s no cost associated with scanning your code. If you haven’t registered yet, simply visit the provided link and log into your account.
Get Started
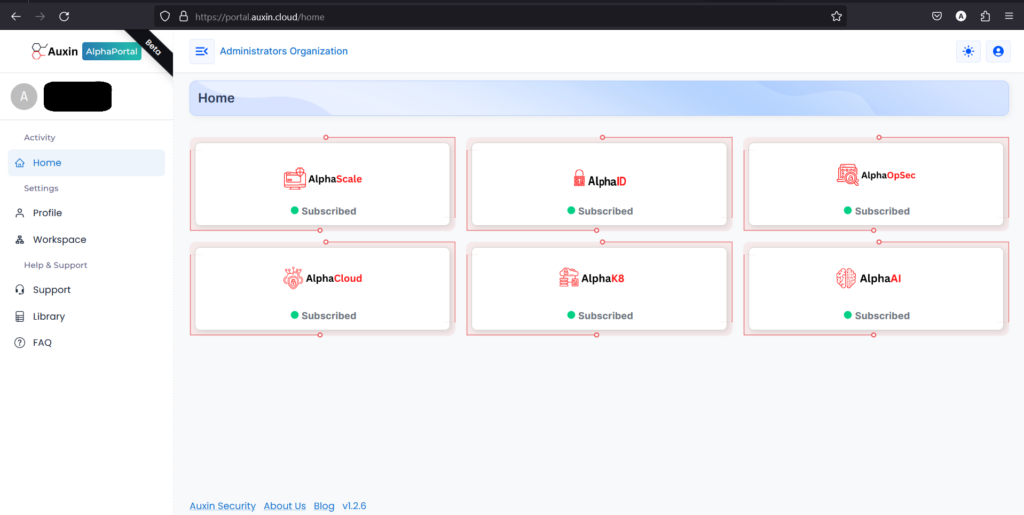
After logging in, you’ll encounter a variety of options displayed. Within these choices, you’ll see AlphaScale, Now, we will click on Alphascale to perform the DAST scan. Upon selection, you’ll be directed to the AlphaScale dashboard, where you can explore and utilize its array of features and capabilities. Now, we will click on Alphascale to perform the DAST scan.
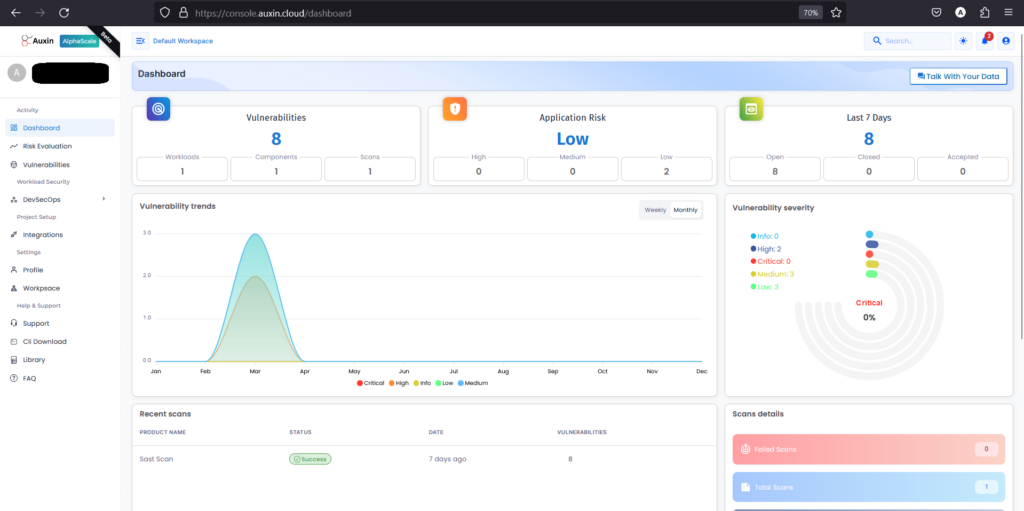
The dashboard presents a wealth of information including details on vulnerabilities, trends, application risks, and their respective severity levels. It provides a comprehensive overview of the security posture of your applications, allowing you to track emerging threats, analyze patterns, and prioritize remediation efforts effectively.
Step 1 – Create Workload
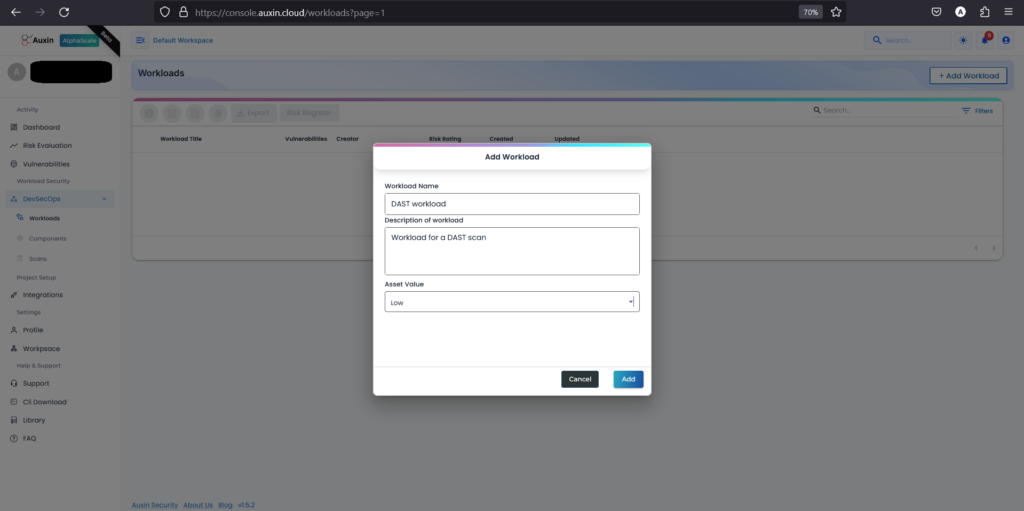
To create a Workload, navigate to the DevSecOps section and click on “Add Workload.” This action initiates the process of defining a new workload within your environment. Workloads typically represent specific sets of tasks, applications, or projects, and adding them allows for streamlined management and monitoring within your DevSecOps workflow.
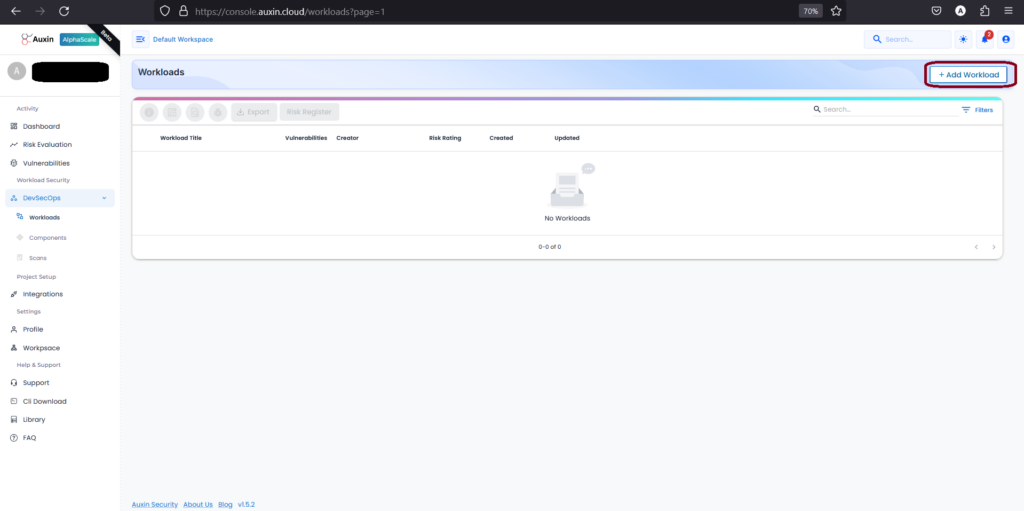
When you click on “Add Workload” within the DevSecOps section, you’ll be prompted to provide essential details such as the Workload Name, Description, and Asset Value. These details help categorize and define the workload, providing clarity and context for its purpose and importance within your system. After entering this information, you’ll proceed by clicking on “Add” to finalize the creation of the workload, incorporating it into your DevSecOps environment for further management and monitoring.
Step 2 – Create Component
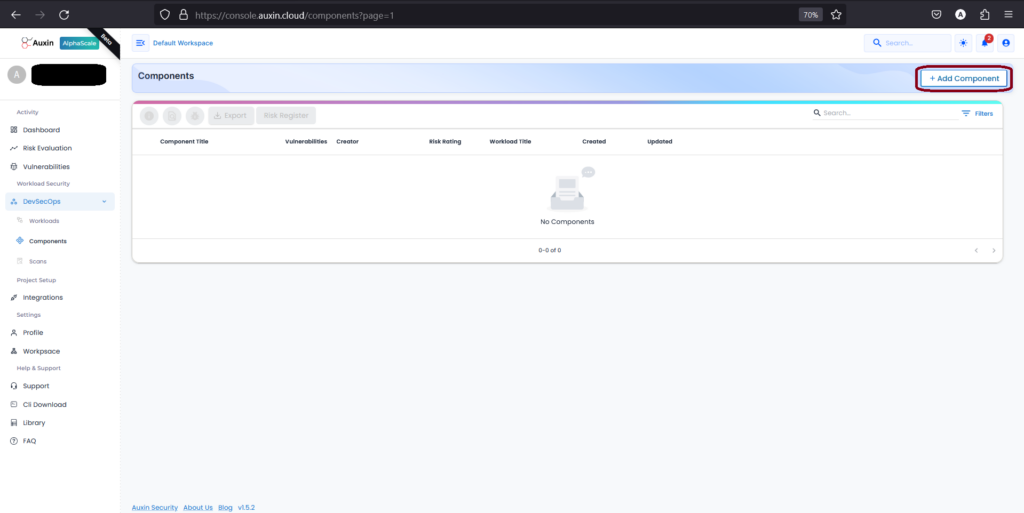
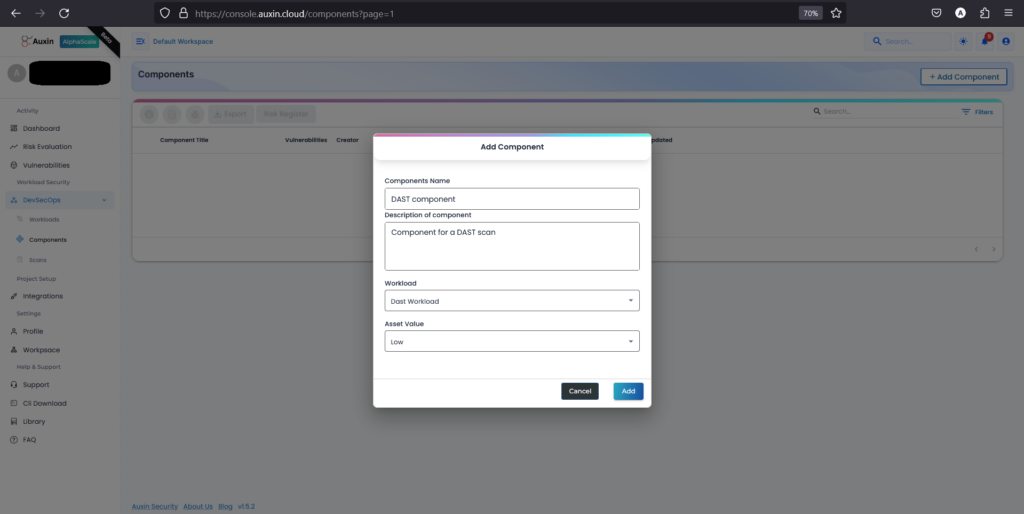
You’ll select the option Add Component to create a Component. This can usually be found by navigating to a specific section or tab designated as “Component.” Once you’ve located this option, proceed by clicking on it to initiate the process of adding a new component to your system. Components serve as individual modules, libraries, or functionalities within your application.
To create a Component, provide its Name and Description, then select the previously created Workload and assign an Asset Value. Finally, click “Add” to complete the process, integrating the component into your project.
Step 3 – Create DAST Scan
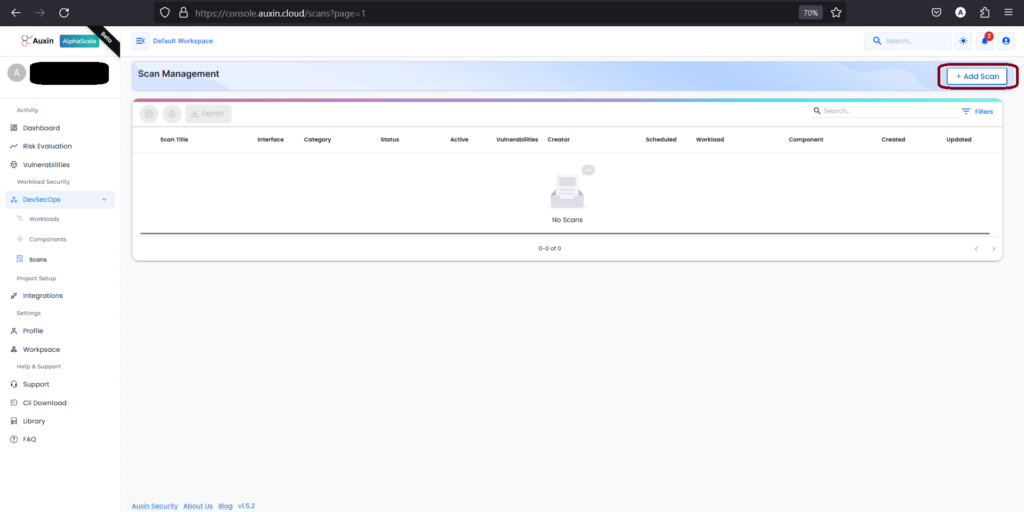
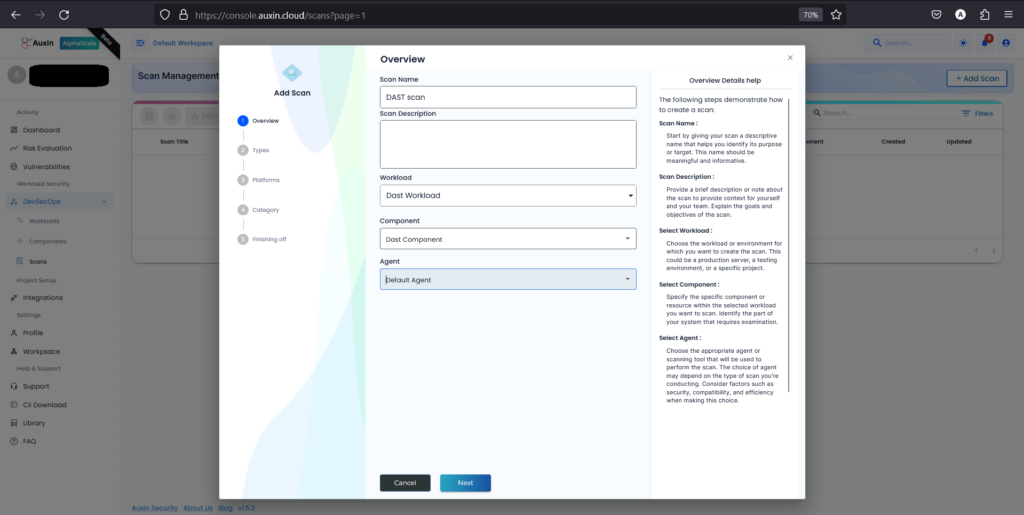
Initiating a scan involves accessing the “Scans” section and selecting “add scan.” This action prompts the system to create a new scan instance, allowing you to specify parameters such as target, scan type, and frequency. By clicking “add scan,” you trigger the process that evaluates the security posture of your application or system.
Enter the Scan Name and Description, Select the Workload & Component you created earlier and Agent (Default Agent), and click Next.
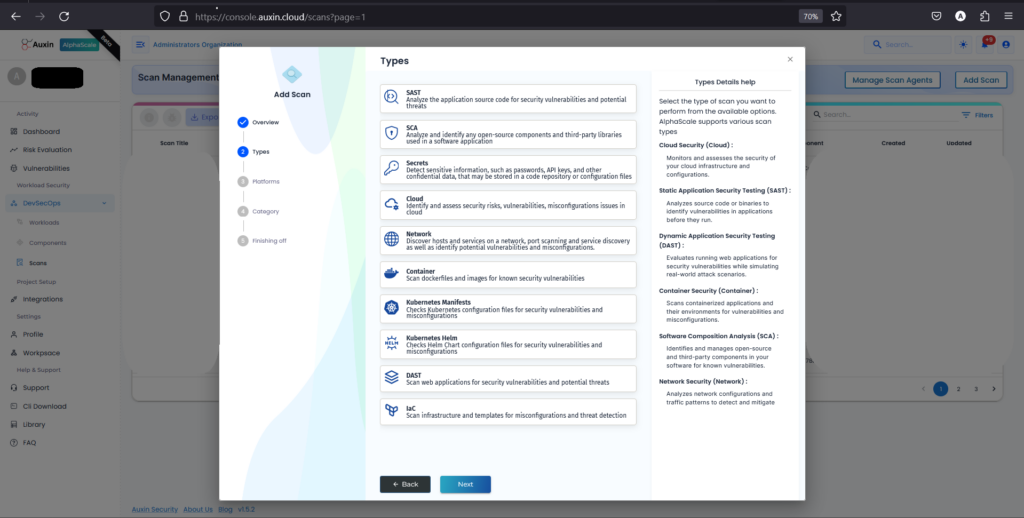
Select the scan type, which is DAST now, and click on Next. This step defines the approach for evaluating your application’s security by simulating real-world attacks. Upon selection and advancement, you’ll proceed to configure further scan settings or initiate the scan process.
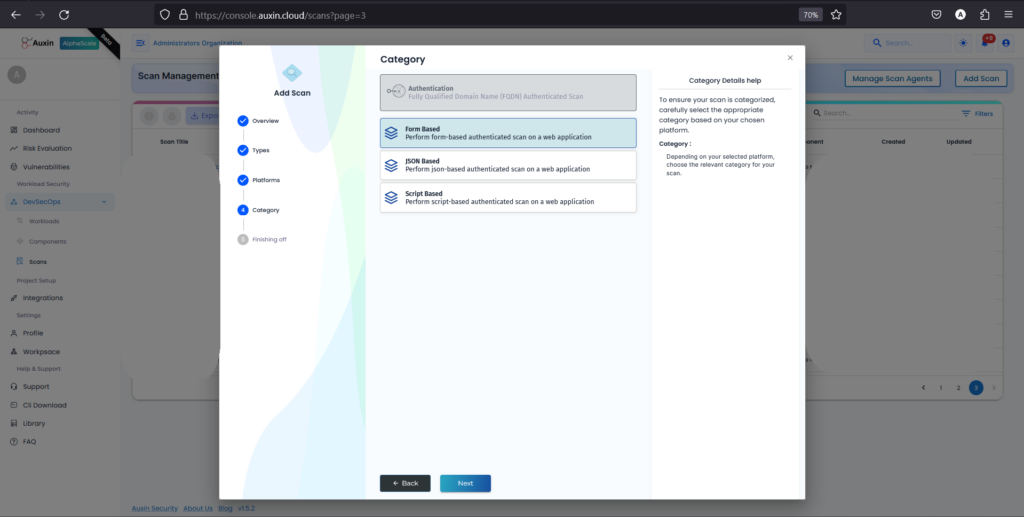
Select the platform, select the authentication scan, and click Next. This step enables the scan to authenticate and access secured areas of your application, providing a comprehensive security assessment. Once selected, click “Next” to advance and configure additional settings or initiate the scan process.

I’ve selected the Form-based Scan and clicked on Next. This choice indicates that the scan will focus on forms within your application, assessing security vulnerabilities specific to form-based interactions.
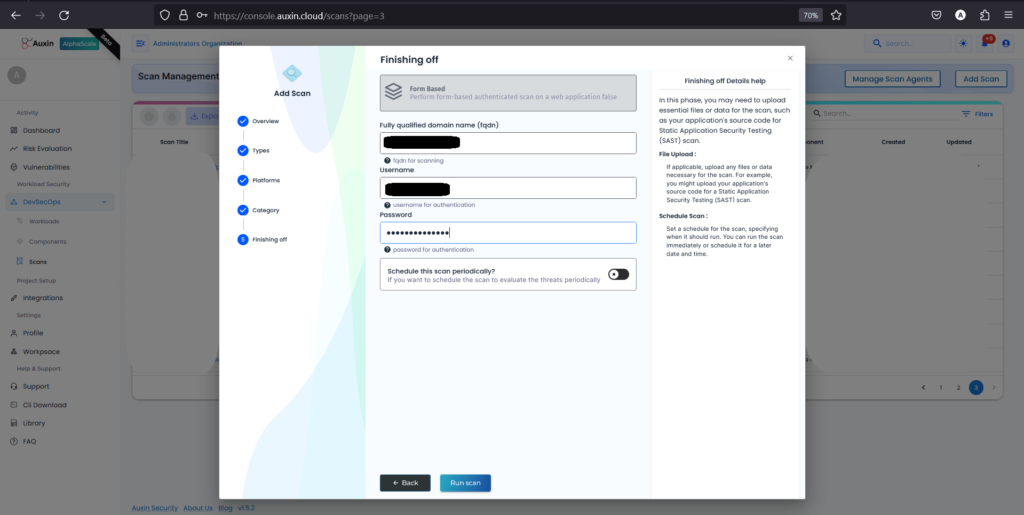
After selecting the Form-based Scan option and clicking “Next,” you’ll be prompted to enter the Fully Qualified Domain Name (FQDN) of your application, along with the corresponding Username and Password for authentication. Once these details are provided, click “Run Scan” to initiate the scanning process.
Step 4 – Review Vulnerabliities
When the scan is completed, you can find the vulnerabilities in your DAST Application. You can typically find these vulnerabilities listed in a report or dashboard provided by your scanning tool. This information enables you to identify and address potential security risks within your application, ensuring its integrity and resilience against cyber threats.
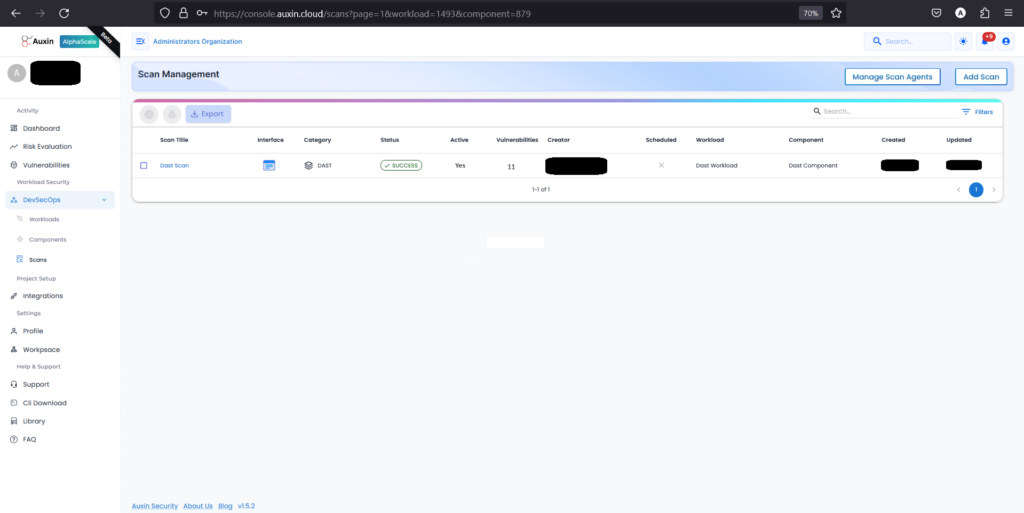
To review DAST scan results, access the scan management dashboard, locate your scan title, and click to Scan title report. Identify vulnerabilities by severity, prioritize fixes, and collaborate with teams to address security risks efficiently.
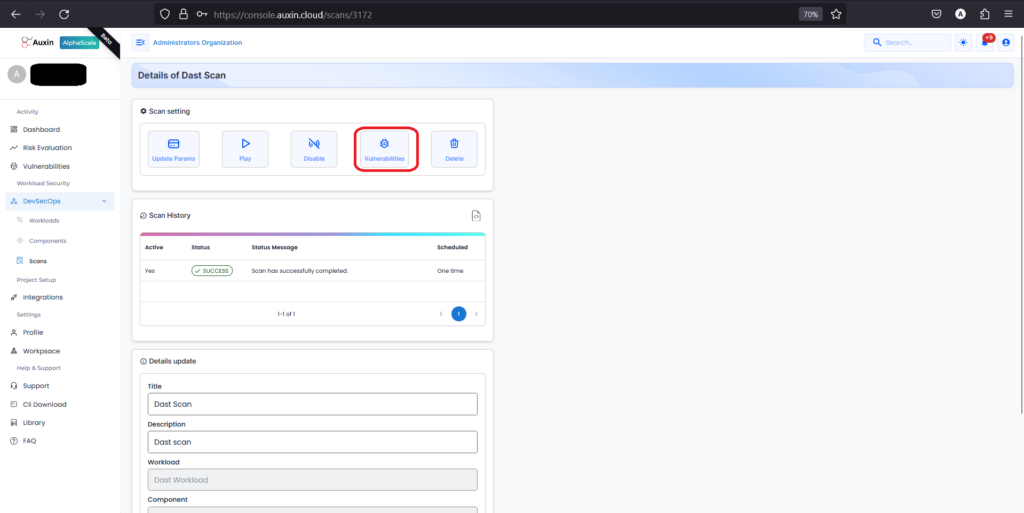
Next, within the details of your SAST scan, locate and click on the option specifically labeled “Vulnerabilities” to access a comprehensive list of the security issues detected during the scan.
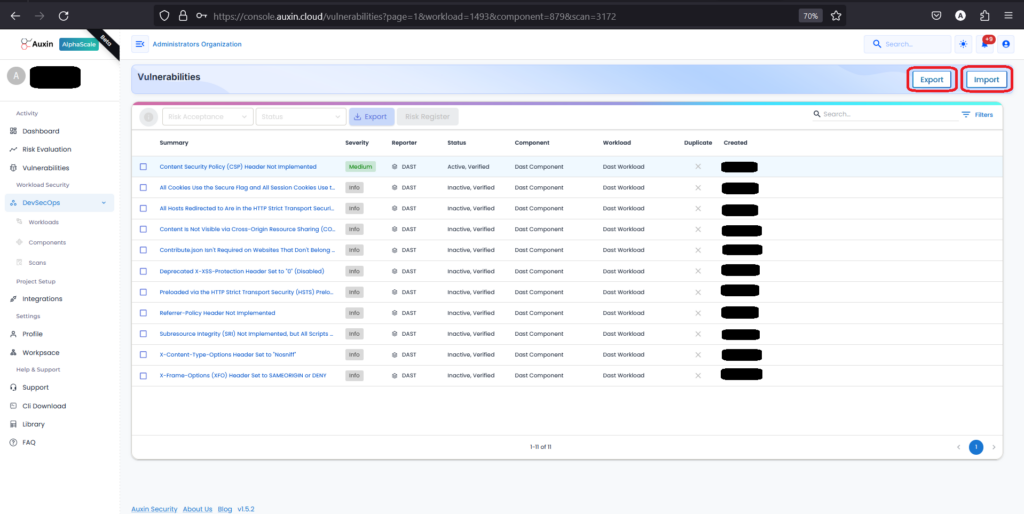
These vulnerabilities are found in my DAST Application; we can also export or import the vulnerabilities.
Next Steps – Prioritizing and Addressing Vulnerabilities
Review Findings: Carefully analyze the vulnerabilities identified by the DAST scan. For each vulnerability, assess the severity level (critical, high, medium, low) and the potential impact on your application. Based on our example, consider a medium-severity vulnerability (Content Security Policy (CSP) Header Not Implemented). CSP is a security standard that helps prevent various types of attacks, such as cross-site scripting (XSS) and data injection attacks, by specifying the sources from which certain types of content can be loaded on your web application.
Prioritize Risks: First, address the most critical, then high, medium, and last one, which is low vulnerabilities. These vulnerabilities pose the most significant security risk and warrant immediate attention. Based on our example, the vulnerability of the Content Security Policy (CSP) Header Not Implemented should be addressed promptly when prioritizing risks. This vulnerability is considered medium severity due to its potential impact on the application’s security.
Remediation Steps: Develop a plan to fix the identified vulnerabilities. This may involve implementing CSP Headers, adding security measures, or defining CSP directives. Based on our example, to remediate the Content Security Policy (CSP) Header Not Implemented vulnerability, follow these steps:
- Assess Current Configuration: Review your web application’s HTTP headers to determine if CSP headers are missing or not correctly configured.
- Implement CSP Headers: Update your web application’s HTTP responses to include Content Security Policy (CSP) headers. Specify CSP directives that define trusted sources for scripts, stylesheets, images, fonts, and other resources.
- Define CSP Directives: Use strict CSP directives based on the principle of least privilege to control content loading from specific sources. For example, use directives like default-src, script-src, style-src, img-src, font-src, connect-src, object-src, media-src, and frame-src.
- Use Nonce or Hashes: Consider using nonces or hashes for inline scripts and stylesheets to mitigate the risk of XSS attacks. Nonces and hashes allow only trusted scripts and styles to be executed, reducing the impact of malicious injections.
- Document and Train: Document your CSP implementation, including the directives used and their purposes. Train developers, administrators, and relevant stakeholders on the importance of CSP and how to maintain and update CSP directives as needed.
Verification and Retesting: Once a vulnerability has been addressed, retest the code to ensure the fix is effective. This iterative process guarantees that your application remains secure. Based on our example, these steps are implemented to verify and retest the vulnerability.
- Verify Remediation Implementation: Verify that the fix has been correctly applied according to the outlined steps.
- Unit Testing: Conduct unit and integration tests to ensure proper functionality and interaction with other components.
- Security Scans: Run scans to detect whether CSP is implemented.
By incorporating this additional step, you’ll establish a clear action plan for resolving vulnerabilities and securing a DAST Application.
How Auxin Enhances DAST Processes
With Auxin, you can automate application security testing, access comprehensive security reports, and address application defects proactively before deployment. Our proficient security experts conduct vulnerability testing according to industry best practices, utilizing a range of security testing tools and proprietary vulnerability scanners to ensure thorough assessment at every application layer. Let’s get in touch with Auxin: https://auxin.io/contact-us/.
Final Thoughts
Dynamic Application Security Testing (DAST) is a vital component of modern cybersecurity strategies, offering real-time insights into web application vulnerabilities. By leveraging DAST tools, developers and security teams can efficiently identify and prioritize security flaws, ultimately enhancing the overall security posture of their applications. The iterative process of reviewing findings, prioritizing risks, implementing remediation measures, and verifying fixes ensures a proactive approach to addressing vulnerabilities and mitigating potential cyber threats. Incorporating DAST into your application security framework not only helps maintain compliance with industry standards but also strengthens resilience against evolving security challenges, safeguarding critical assets and data from malicious attacks.