Secure Your Kubernetes Environment for Free: A crucial guide
Kubernetes Security – An Overview
Kubernetes security refers to the practices, tools, and strategies employed to protect Kubernetes clusters, containerized applications, and associated resources from potential threats, vulnerabilities, and attacks. As a powerful container orchestration platform, Kubernetes requires robust security measures to ensure the confidentiality, integrity, and availability of applications and data running on it.
Unlock the Advantages of Kubernetes Security
Kubernetes Security offers several benefits that contribute to improved data protection, compliance, and security in managing Kubernetes deployments:
- Data Protection: Kubernetes secures sensitive data with encryption and access controls, preventing unauthorized access and tampering.
- Threat Prevention: Security measures like network segmentation and runtime protection reduce risks from unauthorized access and malicious attacks.
- Compliance and Governance: Kubernetes aligns with industry standards and regulatory requirements, ensuring adherence to security guidelines and policies.
- Risk Management: Kubernetes tools identify and mitigate security risks, reducing data breaches and system disruptions.
- Operational Resilience: Secure setups minimize downtime and data loss, enhancing system availability and continuity.
- Secure DevOps Practices: Integrating security into DevOps ensures secure deployments without compromising agility.
- Improved Visibility: Monitoring tools provide real-time insights into cluster activities, aiding incident response and analysis.
- Cost Efficiency: Proactive security measures reduce the impact of incidents and fines, optimizing resource use and decision-making.
Get Started with a Practical Guide
We’re about to dive into a practical guide on conducting Kubernetes security scans. If you want to utilize AlphaScale for this purpose, sign up using the following link: https://portal.auxin.cloud/signup. Scanning your code is free. If you haven’t registered yet, visit the link and log into your account.
Taking the Initial Step
Upon logging in, you’ll encounter a display showcasing a range of options. You’ll find AlphaK8, which you’ll click to access. Once selected, you’ll be directed to the AlphaK8 dashboard to navigate the available features and functionalities.

Dashboard
The dashboard is a comprehensive hub, providing insights into vulnerabilities, trends, application risks, and severity levels. Users can quickly assess their applications’ security posture, prioritize actions based on severity, and stay informed about emerging threats. This centralized interface enhances decision-making by presenting crucial data in a digestible format, enabling proactive risk mitigation strategies.

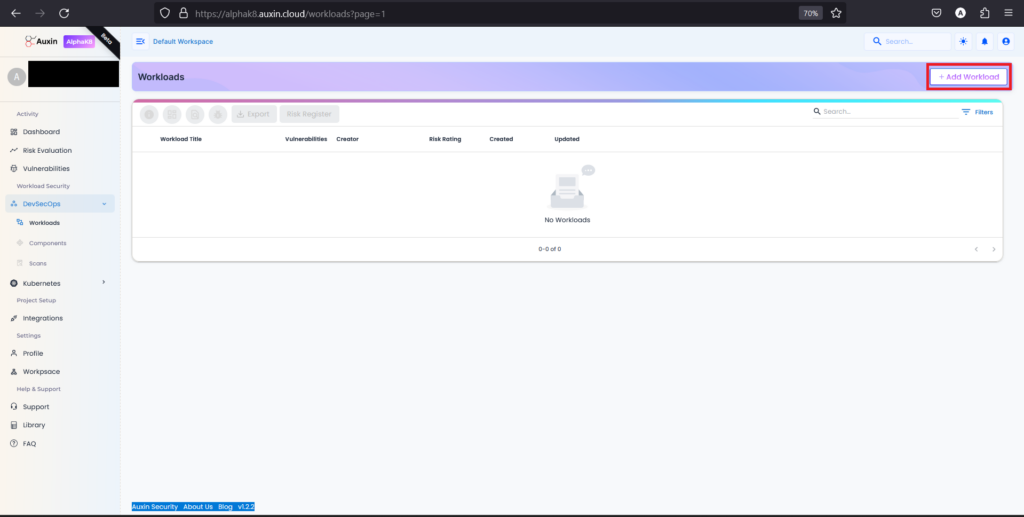
Create Workload:
Creating a workload means teams can systematically organize and manage various components, application risks, and scans. Ultimately, creating a workload fosters a structured and disciplined environment within DevSecOps. Here are the following steps:
Step 1
To create a Workload, navigate to the DevSecOps section and click “Add Workload.” This streamlined process allows users to efficiently allocate resources and manage tasks within their development and security operations.
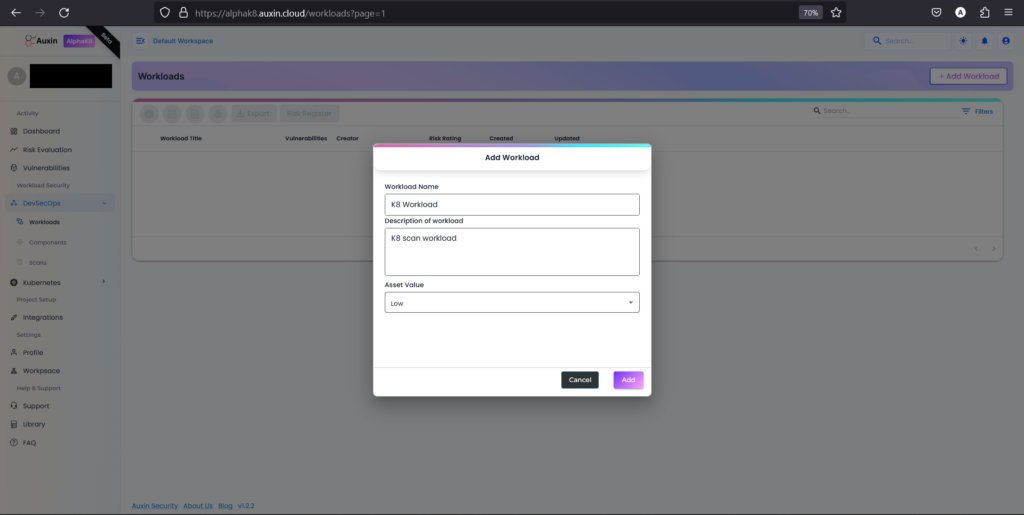
Step 2
Input the desired Workload Name, Description, and Asset Value, then proceed by clicking on the “Add” button. This straightforward process ensures clear identification and categorization of tasks or projects, facilitating effective management and allocation of resources within the workflow.
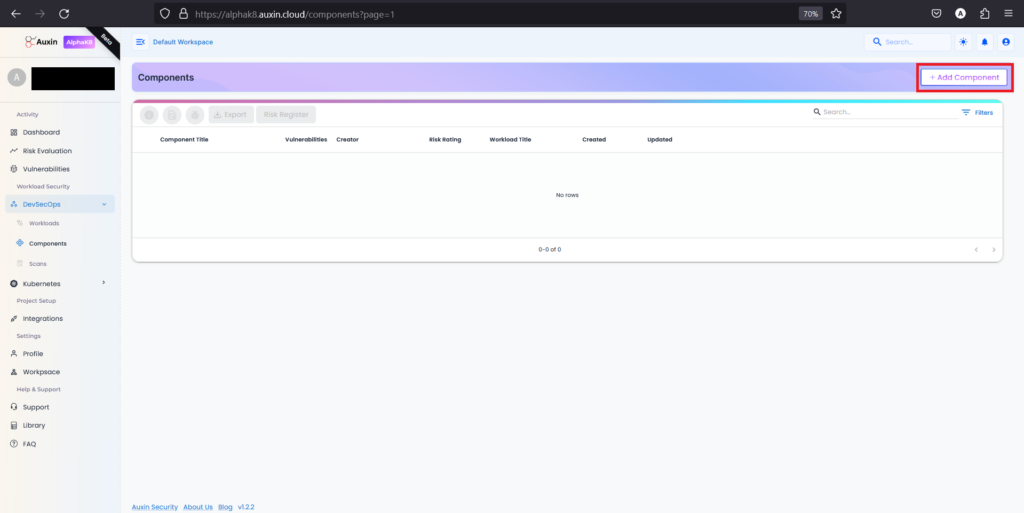
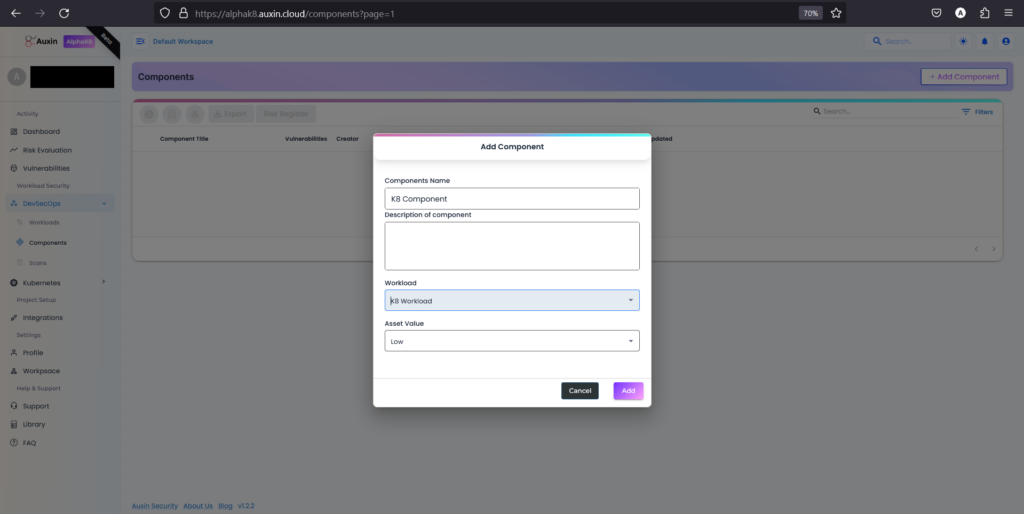
Create Component:
Creating components within the workload ensures accurate representation and efficient management of scan vulnerabilities, facilitating seamless DevSecOps processes. Here are the following steps:
Step 1
To create a Component, access the designated section and select “Add Component.” This straightforward action enables users to incorporate new elements into their projects or systems efficiently.
Step 3
Input its Name and Description, then choose the previously created Workload and the designated Asset Value before clicking “Add.” This systematic approach ensures accurate identification and allocation of components within the project framework, facilitating streamlined project management and resource allocation.
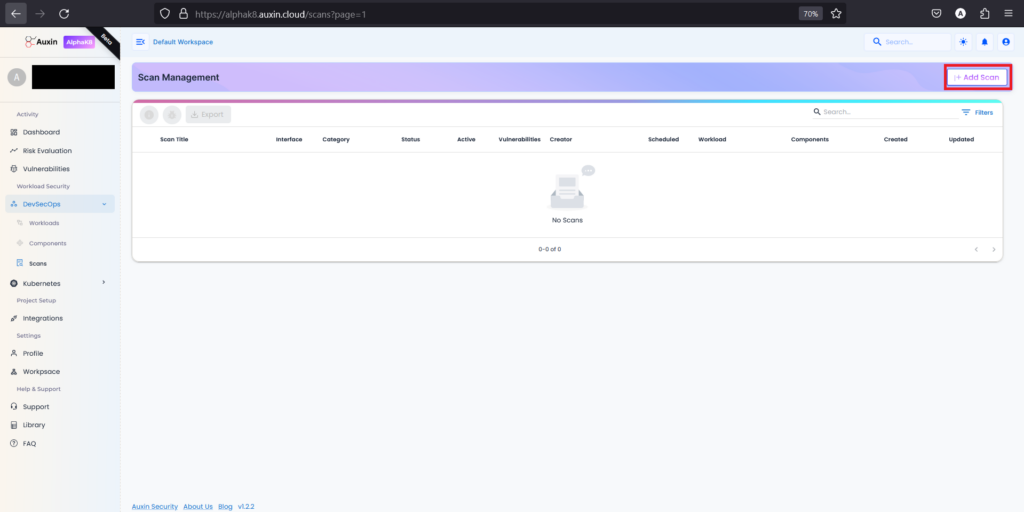
Create Scan:
The purpose of creating a Kubernetes scan is to systematically analyze the manifests and helm charts for vulnerabilities. By initiating this scan, developers can identify and rectify security flaws early in the Kubernetes development process, ensuring a more secure and resilient deployment. Here are the following steps:
Step 1
To initiate a scan, navigate to the Scans section and select “Add Scan.”
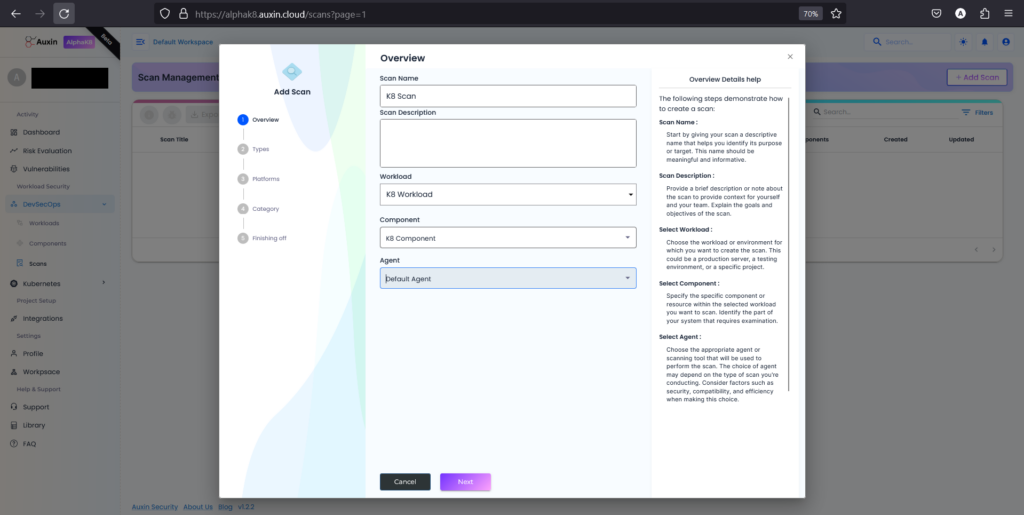
Step 2
Provide a descriptive Scan Name and Description, then choose the previously established Workload and Component. Select the default Agent or specify a preferred one, then proceed by clicking “Next.”
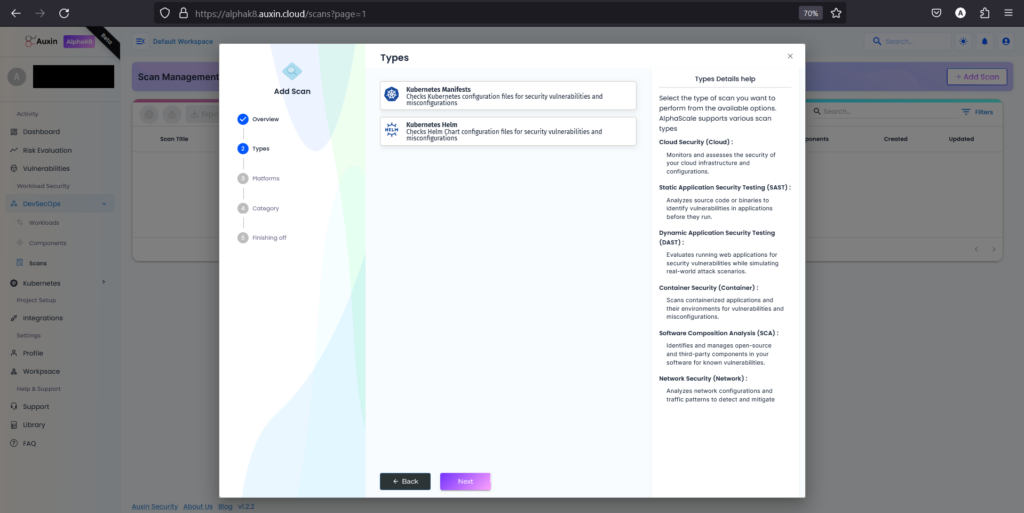
Step 3
Choose the scan type currently set as Kubernetes Manifests, then proceed by clicking “Next.”
Step 4
After selecting Kubernetes as the scan type, choose the platform where your manifests and helm charts reside and proceed by clicking “Next.” This step ensures that the scanning process targets the correct repository or environment where the code is stored, facilitating accurate analysis and detection of security vulnerabilities.
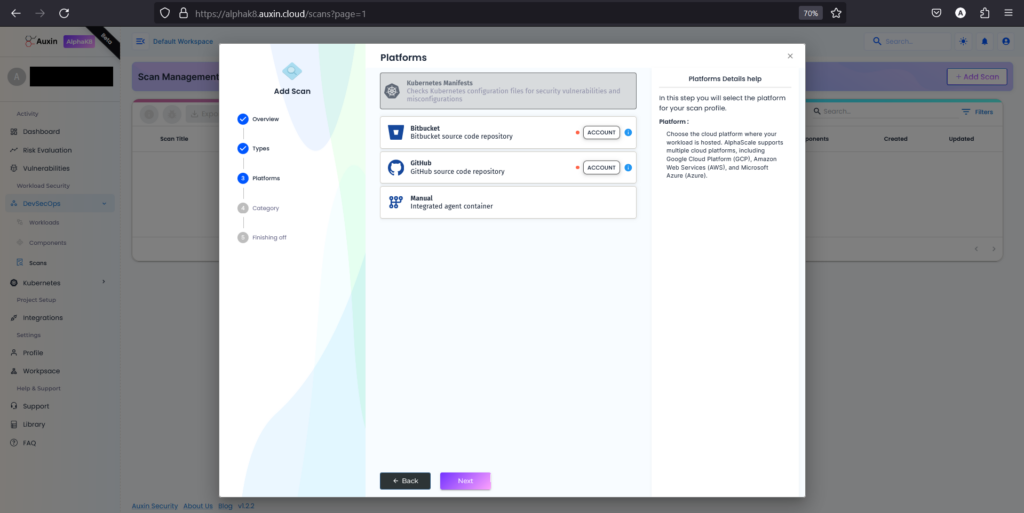
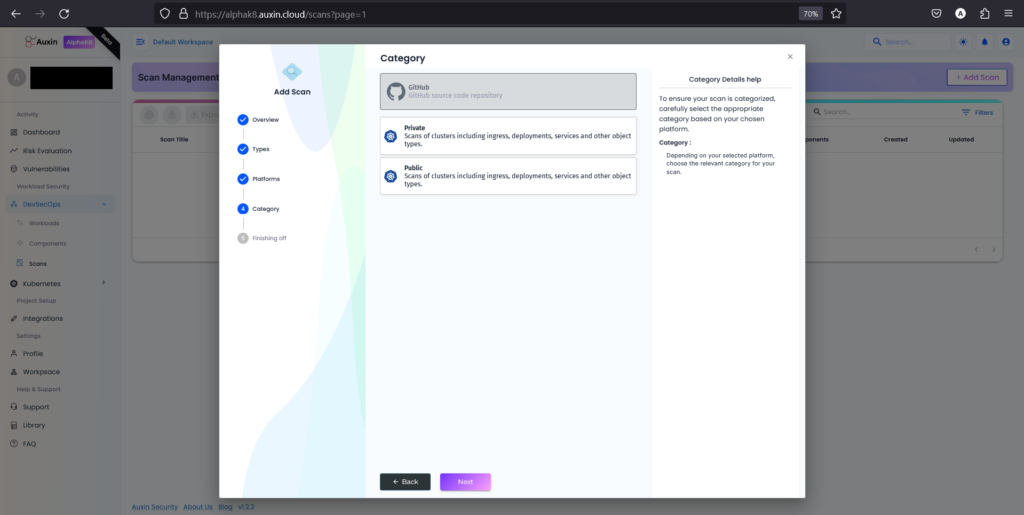
Step 5
After choosing GitHub as the platform for Kubernetes code, select “Private” to indicate that the repository is not publicly accessible, then proceed by clicking “Next.” This ensures that the scanning process can securely access and analyze the code stored in your private GitHub repository.
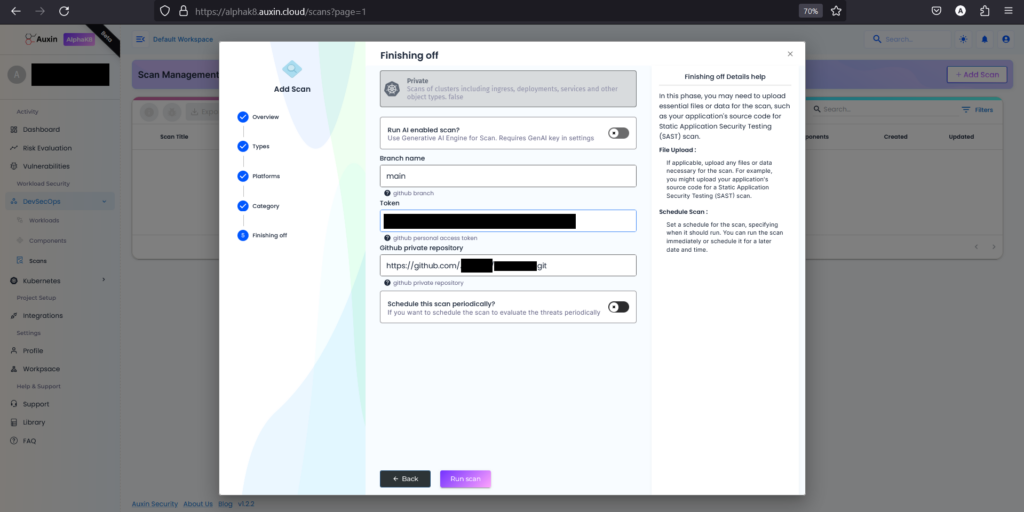
Step 6
Enter the Branch Name corresponding to the branch of your code repository you want to scan, then provide the Token for authentication and the private repository URL. After ensuring the accuracy of the provided information, click on “Run Scan” to initiate the scanning process.
Step 7
Upon completion of the scan, review the generated report to identify vulnerabilities within your Kubernetes code. This comprehensive analysis provides insights into potential security risks, enabling you to prioritize and address issues effectively.
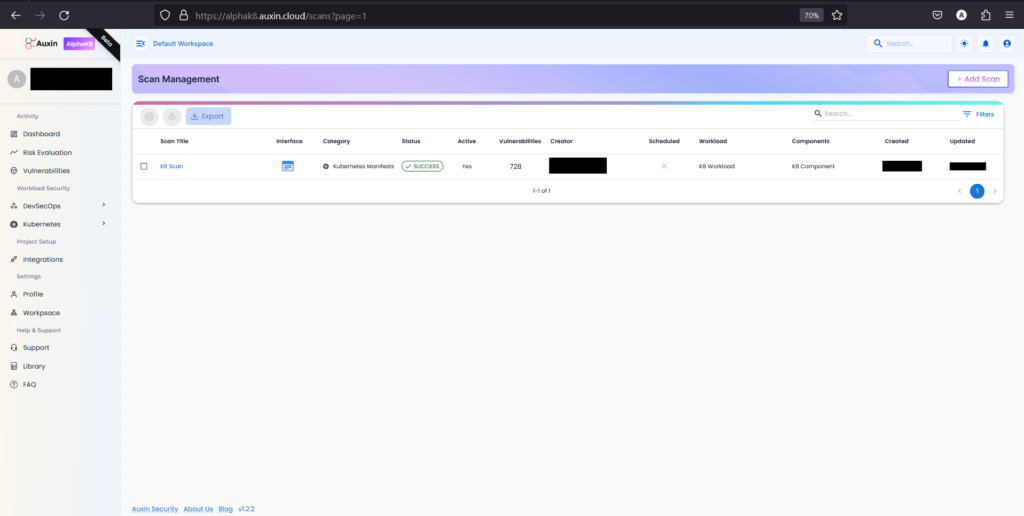
Step 8
To review Kubernetes scan results, access the scan management dashboard, locate your scan title, and click on the Scan title report. Identify vulnerabilities by severity, prioritize fixes, and collaborate with teams to address security risks efficiently.
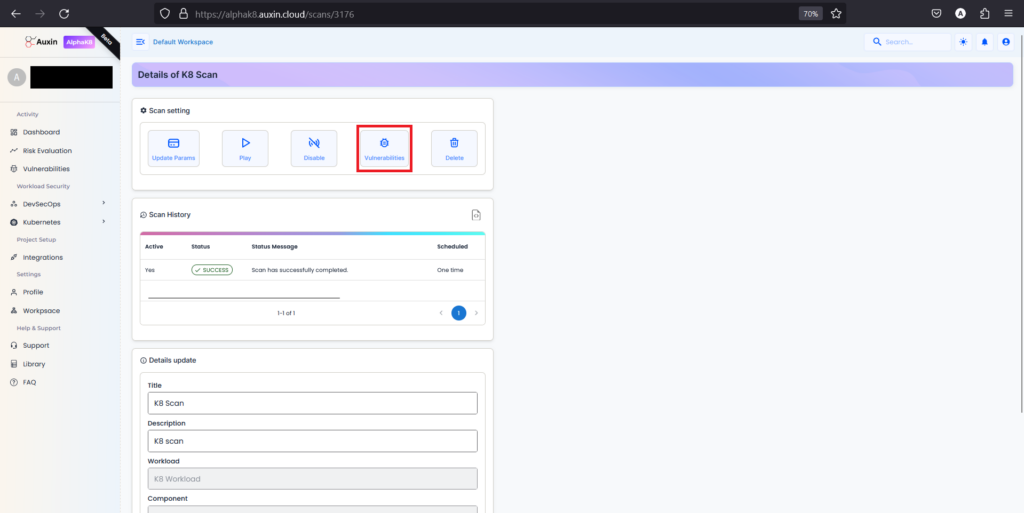
Step 9
Next, within the details of your Kubernetes scan, locate and click on the option specifically labeled “Vulnerabilities” to access a comprehensive list of the security issues detected during the scan.
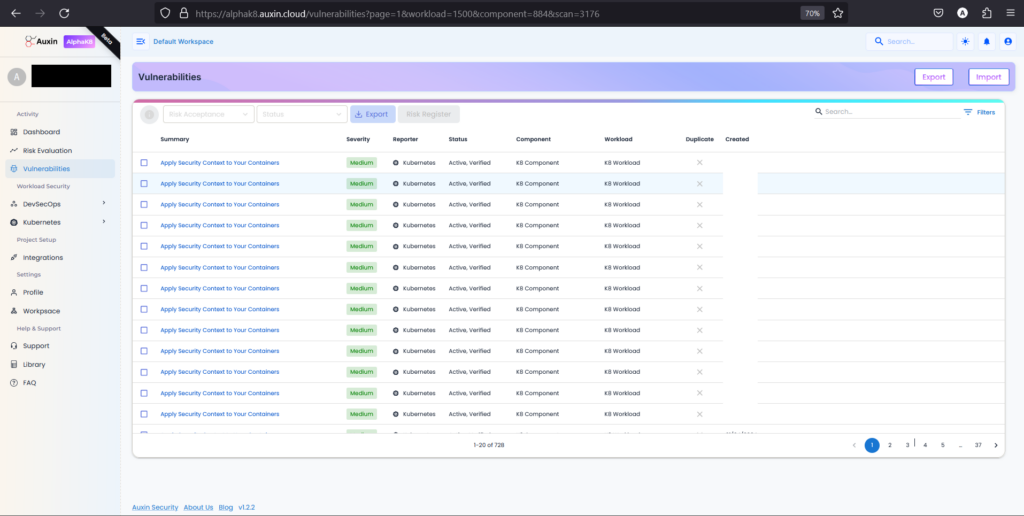
Step 10
After identifying vulnerabilities in your Kubernetes code, you can take several actions to enhance your security measures. One of these actions involves exporting or importing the identified vulnerabilities for further analysis or integration with other tools.
Now Let’s take the next steps – Prioritize and Remediate Vulnerabilities
Review Findings
Carefully analyze the vulnerabilities identified by the KUBERNETES scan. For each vulnerability, assess the severity level (critical, high, medium, low) and the potential impact on your application. Considering our example, the vulnerability “Apply Security Context to Your Containers” refers to the lack of proper security context settings in containerized environments. If security contexts are not correctly configured or are left at default settings, it can lead to various security risks, such as Privilege Escalation, Resource Abuse, Data Exposure, and Container Breakouts.
Prioritize Risks
First, address the most critical, then high, medium, and last one, which is low vulnerabilities. These vulnerabilities pose the most significant security risk and warrant immediate attention. Considering our example, to prioritize the “Apply Security Context to Your Containers” vulnerability, assess its potential impact on data security, compliance implications with industry standards like PCI DSS or HIPAA, attack vectors such as privilege escalation or container breakouts, existing mitigations like SELinux or AppArmor, business impact on critical applications, gather stakeholder input.
Remediation Steps
Develop a plan to fix the identified vulnerabilities. This may involve identifying security groups and modifying egress rules. Considering our example, the remediation steps for the “Apply Security Context to Your Containers” vulnerability include:
- Identify containers lacking proper security context settings and assess their potential risks.
- Define and implement container security context configurations based on least privilege principles, including user/group IDs, file system permissions, Linux capabilities, and SELinux/AppArmor profiles.
- Test the updated security context settings to ensure they do not impact application functionality or introduce new vulnerabilities.
- Monitor container security and conduct regular audits to detect and remediate deviations from the defined security context configurations.
- Educate and train development and operations teams on best practices for container security and security context management to prevent future vulnerabilities.
Verification and Retesting
Once a vulnerability has been addressed, retest the Kubernetes manifests and Helm charts to ensure the fix is effective. This iterative process guarantees that your deployment remains secure. Considering our example, these steps are implemented to verify and retest the vulnerability.
- Verify Remediation Implementation: Verify that the fix has been correctly applied according to the outlined steps.
- Unit Testing: Conduct unit and integration tests to ensure proper functionality and interaction with other components.
- Security Scans: Run scans to detect whether the Security Context was implemented correctly.
By incorporating this additional step, you’ll establish a clear action plan for resolving vulnerabilities and securing Kubernetes Manifests & Helm Charts.
How can Auxin help you with SAST?
With Auxin, you can automate application security testing, access comprehensive security reports, and address application defects proactively before deployment. Our proficient security experts conduct vulnerability testing according to industry best practices, utilizing various security testing tools and proprietary vulnerability scanners to ensure thorough assessment at every application layer. Let’s get in touch with Auxin: https://auxin.io/contact-us/.
Wrapping Up
Kubernetes Security is critical to managing containerized applications, ensuring data protection, threat prevention, compliance, and operational resilience. By implementing best practices, leveraging open-source tools, and staying engaged with the Kubernetes community, organizations can enhance the security posture of their Kubernetes clusters without incurring significant costs. Regular security scans, adherence to security policies, continuous monitoring, and proactive risk management are critical strategies in safeguarding Kubernetes deployments against potential threats and vulnerabilities. With a strong focus on security, organizations can achieve a more resilient and secure environment for their containerized workloads.